用rust写一个ai聊天工具
大约 3 分钟
用rust写一个ai聊天工具
谷歌的gemini
最近谷歌的gemini非常火爆,据说已经超越了chatgpt4.0,我最近也经常使用Gemini,今天就用一个命令行工具,让大家玩一下谷歌的Gemini。完整的代码参考:rs-gpt-chat (github.com)
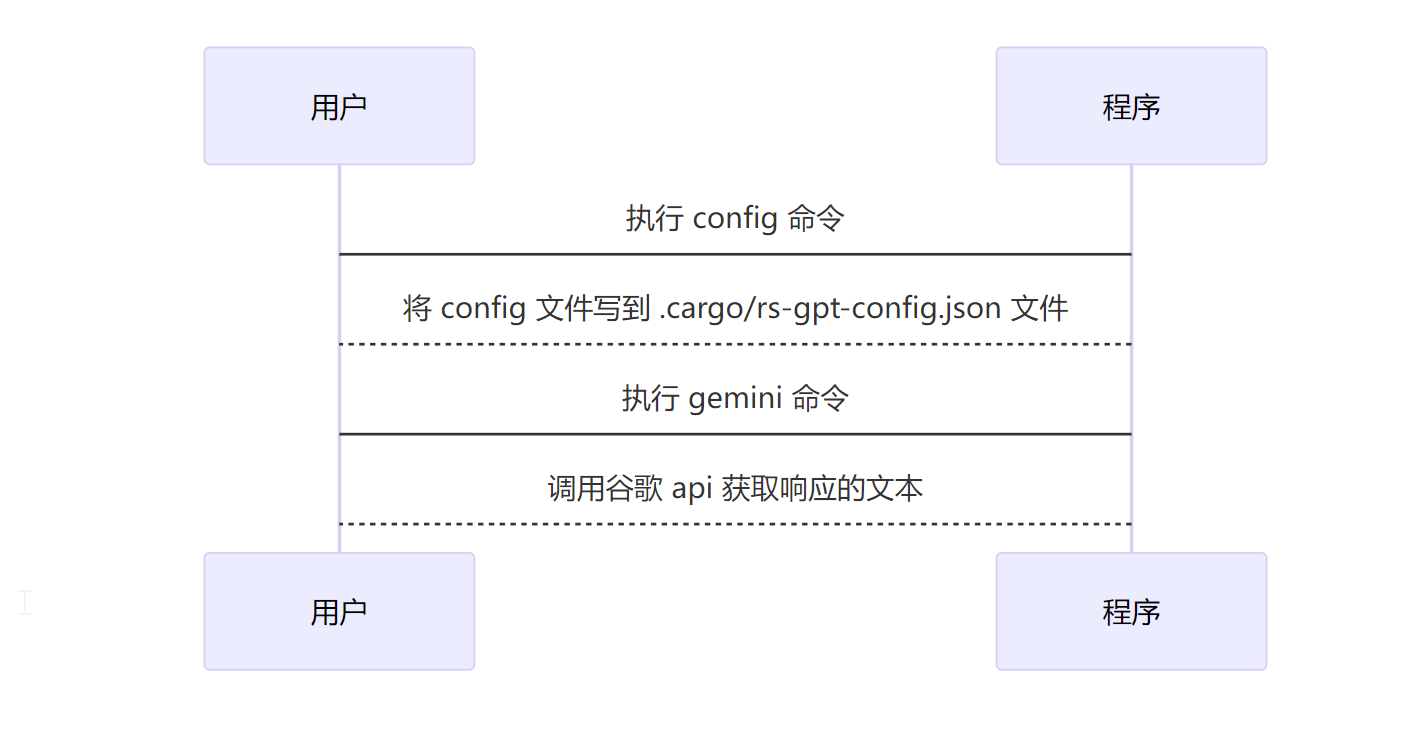
工具执行流程

第一步,创建一个rust项目
使用cargo命令,cargo new rs-gpt-chat创建一个项目;
cargo new rs-gpt-chat
cd rs-gpt-chat
第二步,更新依赖
用Gemini聊天,会用到api调用的包,reqwest,调用Gemini的api返回的json格式数据,需要serde_json进行json序列化和操作。修改Cargo.toml文件。
[dependencies]
clap = "4.4.0"
reqwest = { version = "0.11.4", features = ["blocking", "json"] }
serde = { version = "1.0.136", features = ["derive"] }
serde_json = "1.0.78"
dirs = "3.0.2"
第三步、编写命令行核心代码
use clap::{Arg, Command};
use dirs;
use serde::{Deserialize, Serialize};
use std::fs::{self, File};
use std::io::{self, Read, Write};
use std::path::PathBuf;
mod handler;

fn main() -> Result<(), Box<dyn std::error::Error>> {
    let matches = Command::new("rschat")
        .version("1.0")
        .author("Your Name")
        .about("A simple chatbot using GPT API")
        .subcommand(
            Command::new("gpt")
                .about("let the chatgpt say something")
                .arg(Arg::new("text").required(true).help("Text to say")),
        )
        .subcommand(
            Command::new("config")
                .about("Configure the GPT API key")
                .arg(Arg::new("apikey").required(true).help("API key for GPT")),
        )
        .get_matches();

    match matches.subcommand() {
        Some(("gemini", sub_matches)) => {
            let text = sub_matches.get_one::<String>("text").unwrap();
            let config = Config::new()?;
            let api_key = config
                .gemini_api_key
                .ok_or("API key not configured. Run 'rschat config' first.")?;
            let response = handler::chat_gemini_say(text, &api_key)?;
            println!("{}", response);
        }
        Some(("config", sub_matches)) => {
            let api_key_json = sub_matches.get_one::<String>("apikey").unwrap().to_owned();
            let config: Config = serde_json::from_str(api_key_json.as_str()).unwrap();
            println!("config: {:?}", config);
            config.save()?;
            println!("API key configured successfully.");
        }
        _ => {
            println!("No subcommand provided. Use 'rschat --help' for usage information.");
        }
    }

    Ok(())
}
第四步,实现config功能
config功能主要是把Gemini的api密钥相关配置一下,存储到~/.cargo/rschat-config.json。这里有一个关键点,需要先定位到home目录,使用dirs模块,然后把完整路径拼起来就行了。代码如下:
#[derive(Debug, Deserialize, Serialize)]
struct Config {
    gpt_api_key: Option<String>,
    gemini_api_key: Option<String>,
}

impl Config {
    fn new() -> Result<Self, io::Error> {
        let config_path = Self::get_config_path();
        if config_path.exists() {
            let mut file = File::open(&config_path)?;
            let mut contents = String::new();
            file.read_to_string(&mut contents)?;
            let config: Config = serde_json::from_str(&contents)?;
            Ok(config)
        } else {
            Ok(Config {
                gpt_api_key: None,
                gemini_api_key: None,
            })
        }
    }

    fn save(&self) -> Result<(), io::Error> {
        let config_path = Self::get_config_path();
        println!("config_path :: {}", config_path.to_str().unwrap());
        fs::create_dir_all(config_path.parent().unwrap())?;
        let mut file = File::create(config_path)?;
        let serialized = serde_json::to_string(self)?;
        file.write_all(serialized.as_bytes())?;
        Ok(())
    }

    fn get_config_path() -> PathBuf {
        let mut base_dir = dirs::home_dir().unwrap();
        println!("base_dir :{}", base_dir.to_str().unwrap());
        base_dir.push(".cargo/rschat-config.json");
        println!("base_dir after push :{}", base_dir.to_str().unwrap());

        let target_file = base_dir.clone();
        target_file
    }
}
第五步,实现gemini聊天
修改handler.rs代码,调用Gemini的http接口进行聊天。这里只是最基础的调用,如果想指定更多的参数,可以参考Gemini官方文档进行修改。
pub fn chat_gemini_say(text: &str, api_key: &str) -> Result<String, reqwest::Error> {
    let api_url =
        "https://generativelanguage.googleapis.com/v1beta/models/gemini-pro:generateContent?key=";
    let url = format!("{}{}", api_url, api_key);
    let client = Client::new();
    let response = client
        .post(url)
        .header("Content-Type", "application/json")
        .json(&serde_json::json!({
            "contents": [{"parts":[{"text": text}]}]
        }))
        .send()?
        .text()?;
    println!("response:{}", response);
    let response_json: serde_json::Value = serde_json::from_str(&response).unwrap();
    let choices = response_json["candidates"].as_array().unwrap();
    let replys = choices[0]["content"]["parts"].as_array().unwrap();
    let reply = replys[0]["text"].as_str().unwrap();
    Ok(reply.to_string())
}
第六步,展示成果
先把命令行工具编译好,复制到cargo的bin path下
cargo build
cp target/debug/rs-gpt-chat ~/.cargo/bin
执行config命令,配置自己的apikey。
rs-gpt-chat config "{\"gemini_api_key\": \"your-api-key\" }"
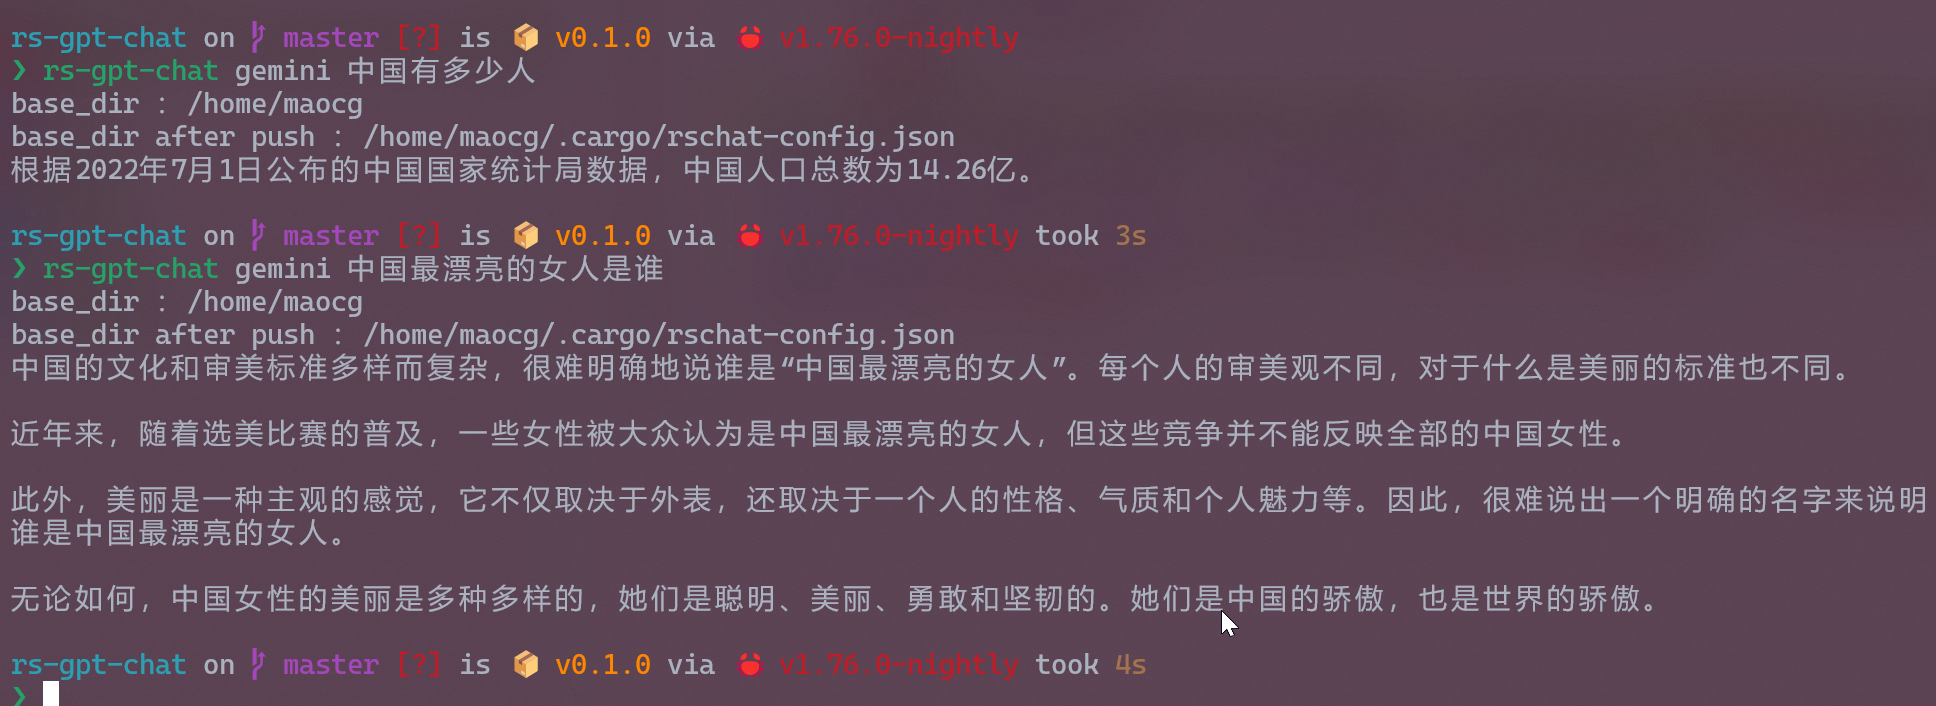
执行gemini命令开始聊天。


扩展
这里出于演示只写了gemini的api调用,可以扩展很多其他功能,比如gpt的api调用,这里已经实现了,由于api没充值所以没演示。
可以加上代理功能,这样就可以使用代理访问谷歌的网站。